Development
Environment setup
Instructions originally written for Ubuntu. Notes have been added for Windows. Mac has not been tested, although setup will likely be similar to the Linux setup with small adjustments.
1. Install virtual environment
Use qgis-venv-creator (see this article) through pipx (sudo apt install pipx):
on Ubuntu:
pipx run qgis-venv-creator --venv-name ".venv"
On Windows, this ran successfully when split into two commands:
Install qgis-venv-creator
pipx install qgis-venv-creator
create your virtual environment:
create-qgis-venv --venv-name ".venv"
If asked to select a QGIS installation, be sure to select “the path to the qgis directory inside the apps directory” (See Documentation). For me this was C:\Users\[my_username]\AppData\Local\Programs\OSGeo4W\apps\qgis, but ymmv.
Then enter into the virtual environment:
. .venv/bin/activate
# or
source .venv/bin/activate
You can also select the python installation included in your venv directory interpreter in VSCode, if that’s the editor you’ve chosen to use. This will automatically activate the venv if you open the terminal/cmd prompt within VSCode.
Old school way:
# create virtual environment linking to system packages (for pyqgis)
python3 -m venv .venv --system-site-packages
source .venv/bin/activate
2. Install development dependencies
# bump dependencies inside venv
python -m pip install -U pip
python -m pip install -U -r requirements/development.txt

# install git hooks (pre-commit)
pre-commit install
3. Dedicated QGIS profile
It’s recommended (but not required) to create a dedicated QGIS profile for the development of the plugin to avoid conflicts with other plugins.
From the command-line (a terminal with qgis executable in
PATHor OSGeo4W Shell):# Linux qgis --profile plg_raft_heatmap # Windows - OSGeo4W Shell qgis-ltr --profile plg_raft_heatmap # Windows - PowerShell opened in the QGIS installation directory PS C:\Program Files\QGIS 3.40.4\LTR\bin> .\qgis-ltr-bin.exe --profile plg_raft_heatmap
Then in QGIS, from the toolbar select
Settings->Options->System. Set theQGIS_PLUGINPATHenvironment variable to the file path on your system where you have cloned this repository. In the screenshots below, the example development plugin is namedProfile Manger: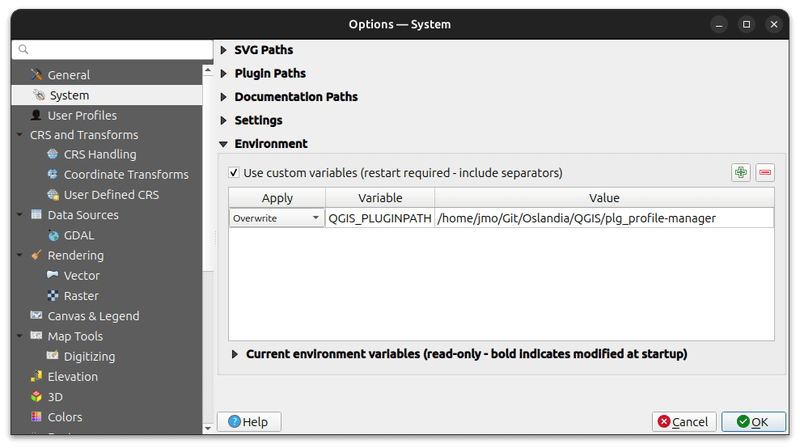
Finally, enable the plugin in the plugin manager (ignore invalid folders like documentation, tests, etc., which will show up in red):
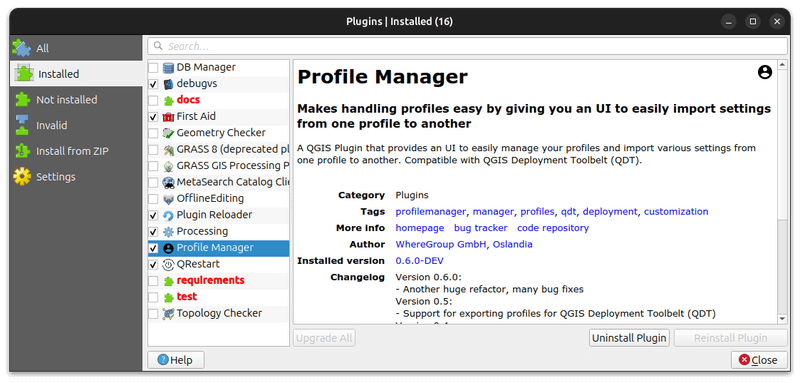
As you edit the plugin code, you need QGIS to reload the plugin in order to see your changes. Use the Plugin Reloader to accomplish this.